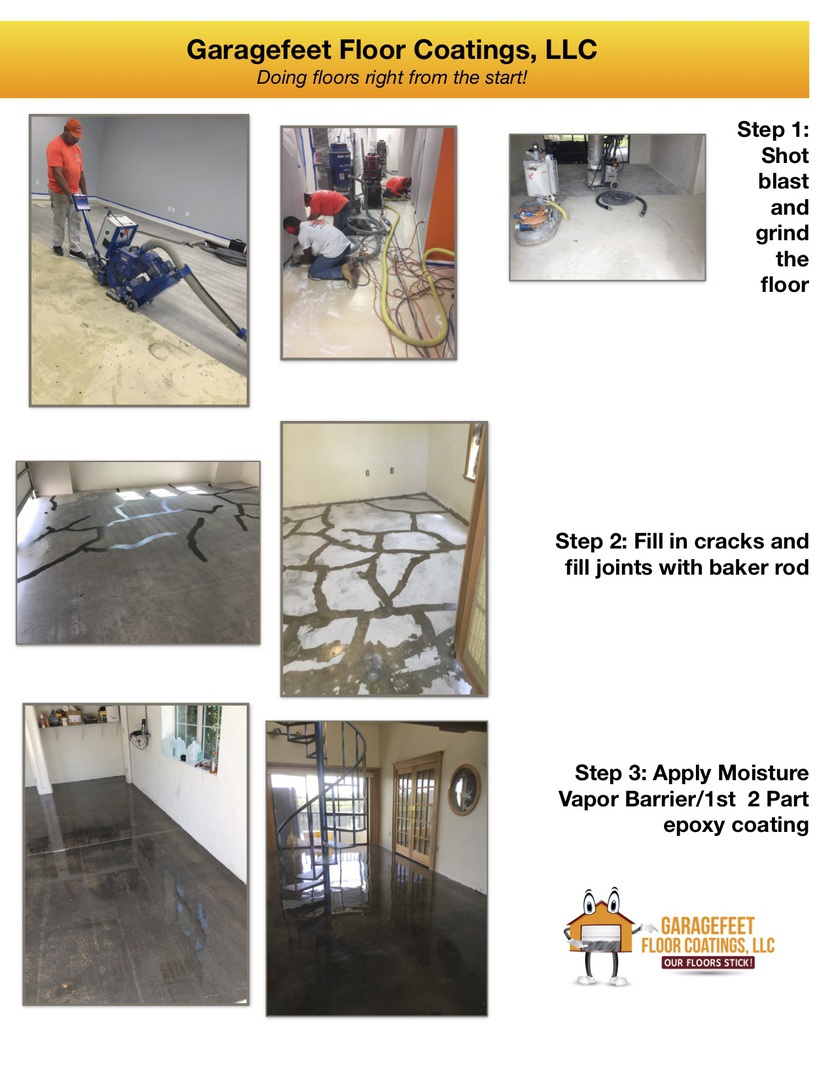
Our Installation Process
From ugly to beautiful...
Choose your flooring system
- Epoxy only (primer/sealers/dustproofer for indoor applications)
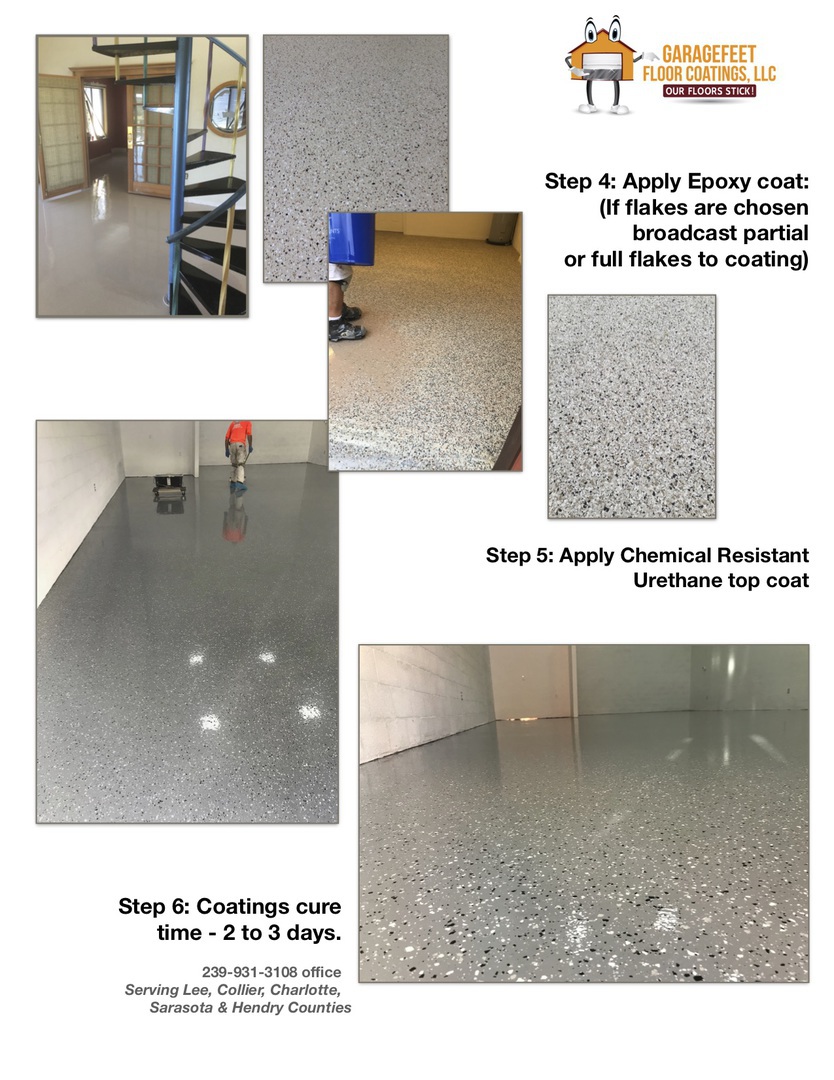
- Epoxy with urethane topcoat (most popular system)
- Epoxy with color chips (light, med, heavy, or full broadcast)
- Metallic and special pigment system
- Color Quartz System (silica sand and microflake broadcast)
- High traffic systems (high-build and parking deck coatings)
- Pool deck coatings (cementitious and elastomeric coatings)
- Boat dock coatings (wood encapsulation)
- Waterproof systems (membranes for elevated decks)
- Paver and concrete sealing (multiple products available)
- Pedestrian traffic systems (epoxy and aggregate high build)
- Fast cure, quick turnaround commercial flooring systems
- High temp, low temp, and commercial kitchen systems
- Hybrid cementitious-urethane coatings
- Water and Solvent based stains (pool decks and driveways)
- Rubberized coating (gym, trailers, playgrounds, food trucks, area's where standing is constant)
- MMA (Ultra-durable Acrylic floors)
Surface Preparation (depends on system)
- Diamond carbide grinding
- Scarifing
- Mastic removal
- Shot blasting
- Pressure washing
- Sanding
- Tile removal
Coatings
- Solvent-based 2 and 3 part epoxies
- Water-based 2 and 3 part epoxies
- Non-slip additives such as glass beads, silica sand, and aluminum oxide
- Urethanes, Polyaspartics, and Acrylics
- Waterproofing membranes
- Concrete and paver Sealers
- Color Quartz silica sand epoxy systems
- Color Flake epoxy systems
- Metallic and Pearlescent epoxies
- Elastomeric coatings
- Microflake broadcast
- Stains
We custom design every floor we install to the owners wishes and budget. The average install process ususally takes 2-4 days for concrete, 1-2 days for
wood, but could take longer, depending on elements such as weather, access, floor size, and the difficulty of the installation process of the system chosen. We keep our customers informed of
the installation progress every step of the way and can work around most any schedule.
How a shotblaster works
PREINSTALL GUIDE
GARAGEFEET FLOOR COATINGS PRE-INSTALL GUIDE
Congratulations on taking the first step towards your new polymer floor! This guide will explain what YOU need to do before and during the installation process and what WE will do during and after the installation process. Keep in mind that this is just a guide, and adjustments might have to be made to insure your experience with Garagefeet Floor Coatings, LLC, will be a great one. Of course, if you have any questions that this guide does not answer, feel free to call us anytime.
WHAT YOU NEED TO DO:
Once we contact you to schedule the install, there are a few things you should do to make sure the install process goes smoothly. First, remove all items from the area to be coated. If you have, for example, a garage full of stuff that need to be removed, you might illicit help from your friends and neighbors for temporary storage room. If you have access to a truck or van for a few days, that might help. See if you can utilize your neighbors garage’s to store some of your items. If all else fails, you can rent a U-Haul truck or a PODS container for a week.
Also, remove any objects that are hanging from the walls or ceiling that may impeded the workers during installation. There is nothing worse than having something fall into fresh epoxy. We once came back the next day after coating and discovered a lawn chair had fallen onto the floor. We had to use a jack hammer to chip it out of the floor, re-sand the floor, and then re-coated it. It set us back a day and the owners had to pay us to clean up the mess and to purchase additional epoxy. So, make sure the area is secure.
Do NOT use water on the floor. Water is the enemy of epoxy, so if there are any water leaks from pipes, air conditioning units, or spigots, please correct those. Sometimes just hanging a can or small bucket under the leak works temporarily. If you cannot control a water leak, please make sure we are aware of it before coating begins. Also, wipe up any spills of oil or other chemicals in the work area.
Be sure to leave us good access to the work area. A 10 ft. X 10 ft. area adjacent to the work area will suffice. This area will be utilized as a mixing station for the epoxies and organization of prep equipment used for this job. For trailers and sheds, make sure we have unhindered access and all locks are removed.
Keep in mind that you will not have access to the work area once we begin coating. Even walking on a dry first coat can leave enough contaminants to cause the next coat not to adhere as well to the first coat. Please refrain from entering the area until instructed by Garagefeet Floor Coatings, LLC.
You will most likely see small bugs, lizards, leaves, insects, or small amount of dust and dirt get stuck on the new epoxy floor. This is a normal occurrence and we will sand or scrape off the larger contaminants before the next coat. If there are contaminants in the final coat that we cannot remove safely, they become a permanent part of the floor. Our warranties do not cover any contaminants that occur during the installation process, but we will make every effort to keep the coated area free of foreign objects during installation. If contaminants are visible after installation and the owner agrees, we may be able to make small repairs to correct the problem for an additional cost. Keep in mind, however, that sometimes a “fix” is more visible than the original problem area.
Our employees are at your home or shop to install a great-looking polymer floor. Since we are there to do a job and need to focus on the tasks at hand, please refrain from starting a conversation with the employees until they have completed their scheduled work. Also, some of our epoxies dry very quickly, so we have to work quickly to avoid the material “cooking” before we get it all out on the floor. Before and after installation, or course, our employees will be happy to answer any questions you have.
If you live in a deed restricted or gated neighborhood, please make sure we have any pass codes or other relevant information to get through the gate. This will help avoid unnecessary delays. Also, if you live in a townhome or condominium, it is YOUR responsibility to make sure we can coat the area without restrictions and that you ACTUALLY OWN the floor, or in the case of rental property, have the WRITTEN PERMISSION of the owner to make repairs or install a polymer floor.
If we are coating a pool deck, please allow the water level of the pool to drop to at least 6 inches below the lowest area to be coated. We will tape off that area and cover some parts your pool with plastic on the installation day and we need to keep the water away. Additionally, on the days of installation, please turn off your pool filter system. This makes it easier for us to install the plastic and it keep areas that need to be taped off from coming into contact with water. Leave the system off until we remove all plastic and tape protections. Please secure the pool deck area and make sure we have a key to any door locks. Make sure the pool attendant or pool service does not show up on install days. Any water leaks need to be mitigated and make sure any repairs to the screen are made before the install date. Holes in the screen lead to pests stuck to your floor. If you have an irrigation system, please turn it off until instructed to turn it back on from us. Once again, water is the enemy of most epoxies.
Please make sure that the lawn service is notified not to cut your lawn during installation. Grass cutting emits large amounts of dust and debris that will find its way to your floor. Also, turn off your irrigation system.
For boat docks and patio areas, please remove all equipment, dock boxes, and water hoses. On boat docks, sheds, and trailers, make sure all flooring nails and screws are flush with the boards.
WHAT WE WILL DO:
After securing the deposit, and/or execution of the contract, we will order the material. Once we have secured the material, we will contact you and set the dates of installation (if not already done). Our first task is to prep the floor. This might be as simple as sanding a trailer floor or as complicated as concrete grinding or removal of previous coatings. Concrete grinding, by nature, makes a lot of fine dust. Although we use a commercial dust vacuum connected to our grinders and shot blasters, dust WILL find a way. We make every effort to minimize the dust spread, but just keep in mind that we cannot contain all of it.
As you know by now, there are many factors that can affect the time it takes to prep a floor. In most cases during the winter months, we can prep the floor and install the first coat all in the same day. Larger areas, or summer month installs limit our time on the floor, and the process will take longer. We will keep you informed as to our every move, and we can adjust our schedules accordingly. Once the first coat is applied, the clock is ticking. We generally have to install the second or subsequent coats within 24 hours after the previous coat to avoid additional sanding. Some systems require the second coat within 6 hours. Since summer-month rain is just about an everyday occurrence, we only prep or coat in the morning…the earlier the better. In the winter, we have a lot more flexibility in coating times and can sometimes get two coats installed in one day, depending on the system. Again, we will make sure you know what is going on every step of the way.
Once we are done coating for the day, we will clean up our mess and secure the area. If we are coating a garage floor, we will unplug the garage door opener and manually drop the door down to about 1 inch off the epoxy. We will leave the bucket of mixed but leftover and un-cured epoxy, and the roller covers we used, at the install location. This is because we cannot transport open material and as the material in the bucket “cooks”, it produces heat that could make transport of the material hazardous. After a couple of hours, the material left in the bucket will cure and cease to produce heat, and can then be safely handled. It will be removed on our next visit.
Once the polymer installation is complete, we will return to remove any tape or masking products, and remove all leftover waste and material. We will answer any questions you might have on the floor and go over the cleaning and maintenance procedures. You will be given a folder that has all your paperwork in it, including the warranty.
If you have any questions about what you need to do before the installation, please don’t hesitate to call us. Thanks you for using Garagefeet Floor Coatings, LLC. We appreciate your business!
Note: The samples of our products that you are shown were made in a controlled environment. Your finished flooring product may not match the sample exactly, due to the environmental differences encountered during the installation process. Also, the harsh Florida sun will eventually start to discolor ANY flooring product, regardless of the material manufacturer or installation process. The time it takes for a coating to begin to fade varies greatly, from a few years to decades, depending on the UV stability of the product and other factors.
Moisture Vapor Barrier
MOISTURE VAPOR TRANSMISSION (8/19)
Client Information Notice
All concrete slabs contain certain levels of moisture. When preparing a slab for a polymer flooring system, there are gases (moisture vapor and other gases) in the concrete that can and will escape from the substrate when the laitance is removed. The laitance is the “cream” of the concrete, a thin, typically smooth top of the slab formed by troweling that acts as a “lid” for the concrete. Normally, gases that are trapped only in the concrete slab will escape after shot blasting or grinding and present few problems for the installation. However, conditions in Florida do exist where there is a continuous flow of gasses under pressure (Moisture Vapor Transmission or MVT) that do not stop after shot blasting or grinding. This is especially true with slab-on-grade floors in Southwest Florida because a vast majority of all of the buildings sit on what was once a swamp. This type of out-gassing can inhibit or even prevent polymer flooring adhesion if the level of vapor transmission is too high. Moisture Vapor Transmission (MVT) can only be measured by invasive testing with certain types of floors under certain types of conditions (core drilling the slab or grinding part of the substrate). Testing non-climate controlled areas such as garages frequently give false readings and are used only as a general indicator of possible MVT issues.
There is a solution to outgassing problems that can be utilized before the floor system is installed. Because of the severe moisture vapor transmission issues that plague our area of Florida, Garagefeet Floor Coatings, LLC uses a MVT barrier epoxy coating as the primer on every epoxy floor we install. A Moisture Vapor Barrier coating works to inhibit high vapor pressure by penetrating below the surface and blocking a certain amount of MVT based on the type of product. We use several different vapor barrier products based on availability, needs assessment, and consumer cost. The basic MVT epoxies (protection up to 10lbs/1000sf/24hrs) are included in the floor system pricing. The advanced MVT epoxies (protection up to 25lbs/1000sf/24hrs) are more expensive and those additional costs are the owners responsibility. Concrete slabs that sit near bodies of water typically have high MVT and the advanced MVT epoxy is recommended or even required in certain instances. There are other products that have higher protection values that a few floors in this area ultimately need, based on testing.
The purpose of this Client Information Notice is to inform the owner of moisture vapor transmission problems that can arise on ANY slab-on-grade floor. If, during the installation process, we find that the basic MVT epoxy is not working due to the MVT being too high, the owner/responsible party will be given the option of upgrading to the advanced MVT barrier epoxy. If the owner/responsible party elects not to install this system after being advised by us to do so, then Garagefeet Floor Coatings, LLC accepts no responsibility for pin-holes, domes, bubbles, de-lamination, adhesion, appearance, or any type of product failure from MVT. Garagefeet Floor Coatings, LLC, will not repair or replace any part of the installed system that is damaged by MVT, and MVT is not covered in any of our warranties.
If you are having a cementitious system installed such as GCPC, MPC, or a concrete overlay, these systems are designed to be “breathable”, meaning they allow some gasses to escape the coating. In certain cases, the “breathability” of a cementitious coating can be overwhelmed by too much MVT pressure, causing domes and bubbles. There are no moisture vapor transmission barriers available for cementitious coatings. Urethane Cement, a fairly recent innovation, is a system that will block any amount of MVT, but these systems tend to be costly. Ask your sales representative for more information on cementitious/urethane systems.
CALL FOR A FREE ESTIMATE TODAY!
Garagefeet Floor Coatings, LLC
8181 Bayshore Rd.
North Fort Myers, Florida. 33917
Phone: 239-931-3108
Email: info@garagefeet.com
Located off I-75, Exit 143, then West for 1/2 mile on Bayshore. On the right before the railroad tracks.
CALL Garagefeet Floor Coatings, LLC
239-931-3108 today! We are your epoxy, urethane, rubberized flooring specialist in Southwest Florida.
Serving ALL of SWFL, including Lee, Collier, Charlotte, Hendry, Desoto, Glades, Sarasota counties
Licensed and Insured!
DC13-00379
LCC20130004166
HC15-0100.SP
AAA-14-00096
1400056
HCR005847
GAWC543152
CERT-0080-2020